Monday, February 28, 2011
BUAH TANGAN
Biskut for tuan puteri tuk di bawa ke asrama.
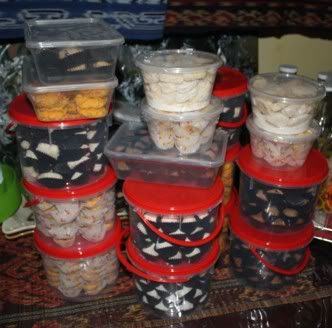
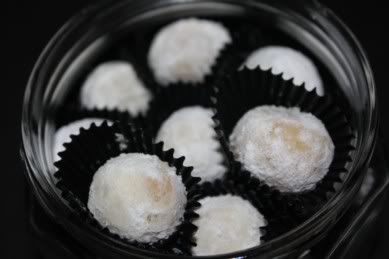
Biskut Makmur
Chocolate Chip
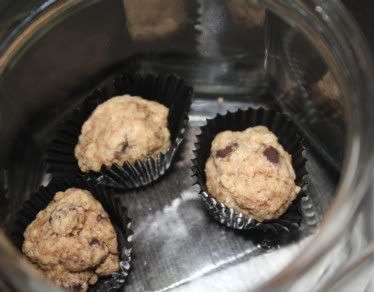
dari satu balang penuh tinggal 3 biji jer..dia sorang jer makan. huhuhu
Biskut Nestum
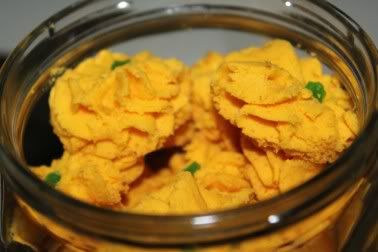
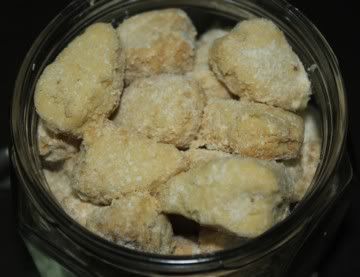
Biskut Dahlia aka Semperit
Selamat Hari Raya semua , maaf zahir dan batin


Biskut Makmur

Chocolate Chip

dari satu balang penuh tinggal 3 biji jer..dia sorang jer makan. huhuhu

Biskut Nestum

Biskut Dahlia aka Semperit
Selamat Hari Raya semua , maaf zahir dan batin
Friday, February 25, 2011
Hari ini 22 RABIULAWAL 1426 bersamaan 1 May 2005 genap 7 tahun datuk tercinta makcik meninggal kan kami. Walau sudah 7 tahun berlalu namun makcik masih merindui nya, masih terasa arwah dekat dan bersama kami. Pagi tadi ketika menyusuri jalan ke kubur arwah kenangan di zaman kecil makcik datang . Mengingati betapa banyak nya nasihat dan pelajaran yang arwah ajar dekat makcik. Tentang hidup , tentang kasih sayang , tentang pegangan hidup, tentang agama dan tentang TUHAN . Segala galanya membentuk makcik hari ini. Al-fatihah buat arwah datuk makcik. semoga tenang di sana. AMIN
Today I appreciate myself for being as strong as I can be for all the ujian dan musibah yang datang. Thanks to arwah datuk for his spirit and love. Tomorrow I will remind myself of the positives in my life . And this one I thanks to the peoples around me. who loves me unconditionally, thru EVERYTHING life has to offer. I love you all
Today I appreciate myself for being as strong as I can be for all the ujian dan musibah yang datang. Thanks to arwah datuk for his spirit and love. Tomorrow I will remind myself of the positives in my life . And this one I thanks to the peoples around me. who loves me unconditionally, thru EVERYTHING life has to offer. I love you all
Wednesday, February 23, 2011
AMISH WHITE BREAD

Amish White Bread By: Peg
Original Recipe Yield 2 - 9x5 inch loaves
Ingredients
475 ml warm water (110 degrees F/45 degrees C)
2 cups warm water
135 g white sugar
2/3 cup white sugar
20 g active dry yeast
1 1/2 tablespoons active dry yeast
9 g salt
1 1/2 teaspoons salt
60 ml vegetable oil
1/4 cup vegetable oil
820 g bread flour
6 cups bread flour
Directions
1.In a large bowl, dissolve the sugar in warm water, and then stir in yeast. Allow to proof until yeast resembles a creamy foam.
2.Mix salt and oil into the yeast. Mix in flour one cup at a time. Knead dough on a lightly floured surface until smooth. Place in a well oiled bowl, and turn dough to coat. Cover with a damp cloth. Allow to rise until doubled in bulk, about 1 hour.
3.Punch dough down. Knead for a few minutes, and divide in half. Shape into loaves, and place into two well oiled 9x5 inch loaf pans. Allow to rise for 30 minutes, or until dough has risen 1 inch above pans.
4.Bake at 350 degrees F (175 degrees C) for 30 minutes.
BUNGA NASIB PART 2
Suka benar dengan perkembangan bunga daun ini. last post ia belum mekar..and tak sangka plak akan mekar sebegini cantik dan berbau harum. Bangga sungguh makcik.
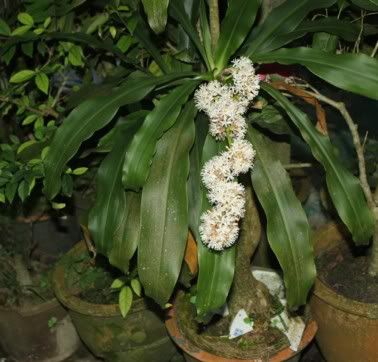
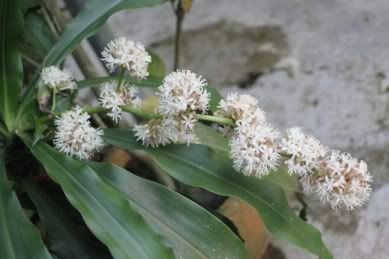
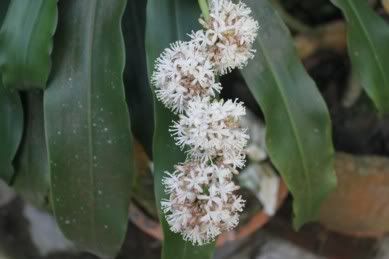
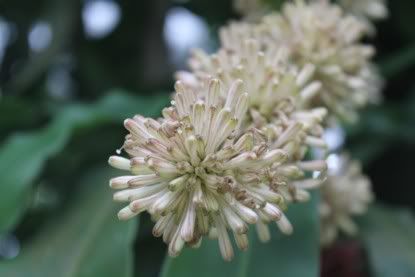
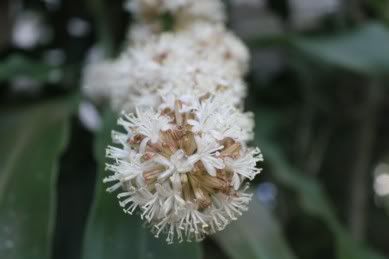
tengok ia punya ke'mekar'an. wangi pon wangi.


tengok ia punya ke'mekar'an. wangi pon wangi.
ROASTED PUMPKIN

My dotter si tuan puteri punya favourite. rebus sebentar with a little bit of salt and agak agak dah lembut bakar..dash with olive oil.
NASI AYAM
2 atau 3 kali sebulan makcik akan masak nasi ayam. Nasi ayam juga merupakan makanan yang paling simple jika kita mengalami kesibukan dan masa yang terbatas. terutamanya jika kita menerima kunjungan tetamu dengan tiba tiba.
Untuk nasi biasanya makcik rebuskan ayam rebusan ayam sehingga mendidih. selalunya makcik juga bahagian tulang atau kerangka ayam. kemudian makcik ambil air rebusan ayam itu untuk di masak dengan nasi . makcik letak daun pandan sehelai dua untuk mewangikan nasi makcik.
air rebusan ayam tu makcik campur kan dengan halia, bawang putih 6 biji dan merah 4 biji kemudian letak lah garam dan pati chicken stock sedikit. kalau nak gaya hidup sihat jangan letak kulit dan lemak ayam tetapi sebenarnya lemak ayam yang direbus didalam soup ayam akan menambahkan rasa sedap nasi ayam kita.
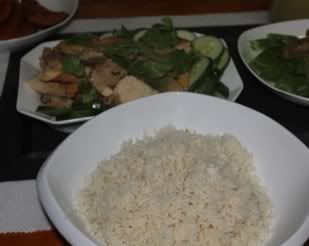
ayam yg di perap dengan garam dan lada putih ini makcik selam sekejap didalam air rebusan ayam kemudian makcik kukus selama 15 minit. pastu makcik curah kan dengan adunan kicap ke atas nya. (sos tiram 2 sudu , kicap cair anggaran 4 sudu dan 3 sudu ayam rebusan ayam - dimasak sebentar supaya sebati)
bab garnishing itu terpulang lah pada cita rasa sendiri.. :)

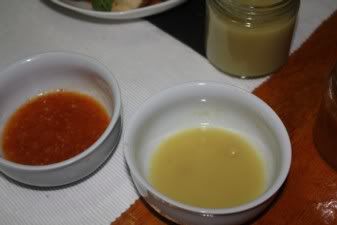
sambal yang sedap semesti nya air tangan sendiri. Untuk cilinya :- blend cili padi , cili besar , sedikit gula, air asam atau air limau kasturi, garam dan 1 biji bawang putih - rasa kan masam, manis dan masin untuk mencapai tahap keenakan anak tekak Untuk Halianya plak - just blend halia muda dan sedikit garam. campurkan dengan sedikit soup ayam dan renih atas api yang perlahan untuk memekat kan nya. letak sedikit chicken stock jika suka
Monday, February 21, 2011
MOLTEN CHOCOLATE CAKE

teringin nak makan chocolate cake ini..tapi bila dah makan penin penin gitu.. wah darah pon naik...tengok lah bahan bahan nya..sedap memang sedap ..for those yang banyak list sakitnya..kena avoid...seriously i meant it.
MOLTEN CHOCOLATE CAKE
(makes three 6-oz ramekin cakes)
- 100g dark chocolate (example, Cadbury Old Gold 70% cocoa), cut to small cubes
- 100g unsalted butter, cut to small cubes
- 2 eggs
- 50g caster sugar
- 20g self-raising flour
To decorate (optional)
- icing sugar and small sieve
- berries
- vanilla ice cream
Directions
1. Melt dark chocolate and butter using either the microwave (see cooking note 3), a hot water bath or a double boiler (note: do not use direct stove heat or the ingredients will burn).
2. In a large bowl, use an electric whisk (you can whisk by hand too but it’s more tedious) to beat the eggs and sugar till the mixture turns pale and frothy. This will take a few minutes.
3. Pour melted chocolate/butter you prepared in step 1, into the egg mixture prepared in step 2. Stir in the flour. Use a spatula to mix everything evenly.
4. Grease your ramekins with some melted butter (so that the cake will come off cleanly when it is baked). Fill the ramekin almost 3/4 full with the chocolate mixture and bake in a preheated oven of 180C (356F) for about 10 minutes. Mine took exactly 11 minutes. The cake is deliberately slightly undercooked so as to achieve its ideal consistency which is runny in the middle (hence the name fondant/molten/chocolate lava) but if you over-bake it, you will get a super moist chocolate cake which is yummy too.
5. When it is baked, remove ramekin from oven and let cool for 1-2 minutes. Use a spoon to gently loosen the edges. Carefully invert the cake onto serving plate.
6. Serving suggestion: Use a sieve to dust icing sugar over the cake. Serve a scoop of vanilla ice cream and some berries at the side.
PANDAN KAYA

4 eggs
330 g castor sugar (if you want sweeter kaya, pls increase the sugar to 340/350 g)
400 ml coconut milk
8-10 piece pandan (screwpine leave)
Method:
Blend pandan (screwpine) leaves with 100ml of the coconut milk in a blender. Strain to discard pulp.In a mixing bowl, lightly beat all the eggs.
Add sugar into beaten eggs. Use a hand whisk to stir mixture until all sugar dissolves (Note 1).
Add coconut milk and pandan juice in (1) into egg mixture. Stir well.
Pour kaya mixture through a sieve (Note 2) into another mixing bowl (stainless steel preferred).
Bring a pot of water to boil. Reduce fire and place mixing bowl over pot of barely simmering water(Note 3). The fire should be really slow (Note 4). Stir kaya occasionally for the first 25 minutes. When kaya starts to thicken, stir it continuously.
When kaya reaches the desired thickness, takes at least another 1 hour, remove it from heat. Cool completely (Note 5) before storing it in a clean jar. Keep refrigerated.Spread over bread, plain crackers, serimuka etc.
NOTES:
1. It takes longer to dissolve granulated sugar than castor sugar. Make sure all the sugar dissolves before adding coconut milk.
2. The purpose of pouring kaya mixture through a sieve is to eliminate big air bubbles, formed during the whisking process. Existence of air bubbles will result in non-consistent or lumpy kaya.
3. I suggested double boiler heating method as this method would give a considerably slow heating effect to the kaya mixture. However, if your stove does come with a slow fire function, use direct method. The whole cooking time will be reduced.
4. With the real slow fire I was using, it took about 25 minutes before kaya mixture started to thicken. After this stage, stir mixture continuously as it gets thicken faster.
5. Kaya will turn thicker when it is cool.
Thursday, February 17, 2011


BLUEBERRY CHEESE CAKE

this one plak makcik buat semata mata untuk menunggu anak makcik yang balik untuk cuti semester dari sinun. eh..tak ada makna nya dia nak makan satu biji besar kan..so end of the day makcik juga lah jadi vaccum cleaner nya.
BLUEBERRY CHESSY CAKE
Ingredient A
BASE
120G Digestive biscuits – crushed (biscuit marie)
50g butter
Ingredient B
500g cream cheese
100g evaporated milk
50g blueberry yogurt
Ingredient C
½ lemon juice
Ingredient D
4 tbsp gelatin powder ( or you can use agar agar powder)
6 tbsp hot water
Mix well with gelatin
Ingredient E
200g whipping Cream
Ingredient F
Some amount of blueberry filling
Method:-
Combine crushed biscuit and melted butter and press it hard onto a 8” cake mould. Place it in fridge. Set aside
Beat cream cheese and put in evaporated milk. Beat well . add in yogurt. Beat till fluffy. Add in C. Stir well. Add in D. Fold in E and beat well.
Pour ½ of the mixture onto chilled biscuit base. Layered it with blueberry filling and cover it with the remaining mixture. Chill the cake in the fridge for about 4 hours or till set.
sila lah buat iyer , senang sesangat. the taste..ada masam masam sikit. sebab makcik nih tak berapa suka makan manis . kalau yang sweet tooth tu taruh lah sikit gula (dalam 30gm - but not more to 100gm) nanti terlampau manis sebab filling blueberry tu pon dah manis .
RED VELVET 2
Red velvet
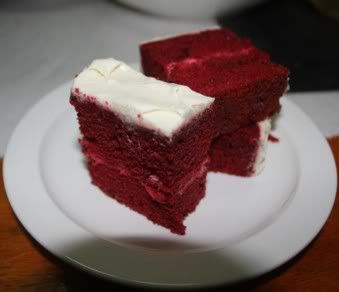 Kek Red velvet yang jadi bualan orang seantero dunia siber. Ini kali kedua makcik buat kek ini. kali ini makcik menggunakan resipi mantan. And this resipi is the best. rasanya penukaran ke milo tidak menjejaskan rasanya .Pendapat makcik berbanding koko rasa kek velvet menggunakan milo lebih sedap, and i was wondering kalau menggunakan perisa buah roselle akan memberi rasa yang lebih ummphhh. (will kiv untuk mencipta kek red velvet rosselle plak)
Red Velvet Cake (Baldu merah)
sebab tekstur yang gebu macam baldu (RESIPI CREDIT TO MANTAN IG)
Bahan-bahan kek
2 1/2 cawan tepung gandum (tepung kek)
1/2 camca teh garam halus
2 camca besar serbuk koko (NOTA SAYA : ARI TU GUNA SERBUK MILO JER SEBAB SERBUK KOKO TAK ADA DLM STOCK
1/2 cawan mentega tanpa garam, suhu bilik - jangan letak garam kalu guna mentega biasa
2 biji telur saiz besar
1 camca teh esen vanila
1 cawan, lebih kurang 240-250 ml buttermilk (NOTA SAYA: BANCUH SUSU DAN LETAK 2 SUDU MAKAN CUKA PUTIH - BIARKAN 2 - 3 JAM)
2 camca besar pewarna merah
1 camca teh cuka putih
1 camca teh baking soda
Bahan Krim Keju
300 ml (360ml) krim putar
1 tub-200g/250g keju krim, suhu bilik (227g)
250g keju mascarpone, suhu bilik (227g) - boleh pakai keju krim biasa kalau susah nak dapat mascarpone. Mascarpone ni keju krim jugak, tapi italian style.
1 cmt esen vanila
1 cawan gula aising
Cara membuat kek:
1. Leser 2 dulang kek 9-inci yang nipis. Alas dengan kertas.
2. Panaskan oven 175 darjah C lebih kurang 10 minit sebelum membakar.
3. Ayak tepung, garam halus dan serbuk koko. Ketepikan
4. Putar mentega sampai lembut (1-2 minit, boleh lebih kalau mentega keras). Masukkan gula dan putar sampai kembang membuak-buak (betul ke ni? 'fluffy'). Anggaran 2-3 minit. Jangan lupa adunan yang terpercik tu kena kikis la jangan dibiarkan.
5. Masukkan telur satu demi satu. Setiap kali lepas masuk sebiji mesin dulu sampai rata. Dah abih semua telur, kikis adunan tepi-tepi mangkuk tu. Masukkan esen vanila.
6. Campur pewarna merah ke dalam buttermilk. Gunakan kelajuan rendah, masukkan adunan tepung dan buttermilk secara bergilir. Mula-mula masuk buttermilk, tepung pastu buttermilk.
7. Campurkan cuka dan baking soda dalam cawan kecil. Masa campur tu nanti bunyi berdesit-desit la macam buat eksperimen kimia tu. Terus tuang dalam adunan kek.
8. Bahagikan adunan sama rata dalam tin pembakar kek tu. yang ni kena buat cepat-cepat sebab kalau lama-lama takut kesan-kesan soda+cuka+cecair adunan tak berkesan sangat. Ratakan adunan tu guna belakang senduk/sudu.
9. Bakar lebih kurang 25-30 minit, sila cucuk dulu kek tu nak tengok dah masak atau belum.
10. Dah masak, keluarkan kek. Sejukkan lebih kurang 10 minit pastu terus keluarkan daripada tin dan disejukkan. Bila dah sejuk, boleh la balut ngan plastik tutup makanan tu, masukkan dalam peti es untuk memudahkan proses pemotongan nanti.
Cara membuat krim keju
1. Putar kedua-dua keju tu sampai kembang.
2. Masukkan esen vanila dan gula aising.
3. Putar pulak krim putar sampai dapat soft peak. Sendukkan krim ke dalam campuran keju. Kacau dengan teknik 'fold'.
4. Krim sedia untuk disapu, kalau cair sangat masukkan dalam peti es dulu kasi dia keras sikit.
Sesi pemasangan (hahahahaha!)
1. Belah setiap kek jadi dua lapisan. Letakkan salah satu lapisan atas (selalunya dia macam jadi tinggi kan) secara terbalik. Sapu krim frosting.
2. Letak satu lagi lapisan dan sapu krim sampai habih lapisan. Nak bahagikan krim tu, bahagikan 5 bahagian, 3 bahagian untuk 3 lapisan tengah, 2 lagi untuk sapu kat luar.
Wednesday, February 16, 2011
KIKI
Kucing ku yang gebu seperti puan nyer jugak.
si kiki yang manja dan understanding. bermata biru tetapi juling dan sepet

tengok bulus bulus yang gebu ini...nih masa sun bathing..mandi matahari gitu.

si kiki yang manja dan understanding. bermata biru tetapi juling dan sepet

tengok bulus bulus yang gebu ini...nih masa sun bathing..mandi matahari gitu.

The Gift
Hari ini 16/02/2011 dapat hadiah dari seseorang istimewa, jauh tapi dekat di hati
 Charles n keith

and bonus nya LV..teruja giler


alhamdulilah rezeki yang di turunkan ALLAH melalui seseorang yang kita percaya dan sayang.

 Charles n keith
and bonus nya LV..teruja giler


alhamdulilah rezeki yang di turunkan ALLAH melalui seseorang yang kita percaya dan sayang.
Sunday, February 13, 2011
Character cannot be developed in ease and quiet. Only through experience of trial and suffering can the soul be strengthened, ambition inspired, and success achieved
so Be thankful for what you have; you'll end up having more. If you concentrate on what you don't have, you will never, ever have enough.
so Be thankful for what you have; you'll end up having more. If you concentrate on what you don't have, you will never, ever have enough.
kucing ooh kucing
kesian kucing ku yang tak terjaga ini.

yang ini nama nya sumi. muka jadi macam itu sebab nyamuk gigit. kesian dia.
ini adalah kiki. pendiam dan tak banyak songeh. yang ini hilang di curi :(


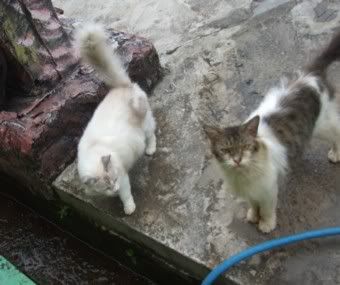
akhirnya after reconsideration..hanya 3 ekor di jaga, yang lain berpindah ke rumah baru.

yang ini nama nya sumi. muka jadi macam itu sebab nyamuk gigit. kesian dia.
ini adalah kiki. pendiam dan tak banyak songeh. yang ini hilang di curi :(


akhirnya after reconsideration..hanya 3 ekor di jaga, yang lain berpindah ke rumah baru.
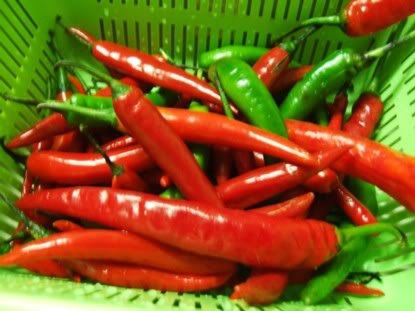
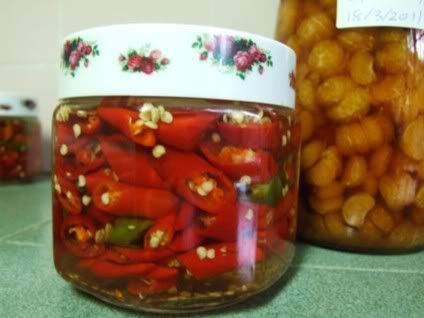
CHILI PICKLES
disebabkan chili sangat murah di pasar, jom lah kita buat jeruk sikit. sedap di makan dengan mee goreng dan yang sewaktu dengan nya.
Pickling Your Chillies
As with the other preserving techniques, make sure you wash your chillies and eliminate any bruised or seriously blemished fruit. They will only go mushy in the pickle and you won't want to use them. Also, if you are pickling for presentation, blemished chillies will really spoil the effect.
Stuff You Need To Remember
•Sterilise your jars in boiling water or an over set 110°C for approximately 10 minutes. Take care handling hot glass as it retains it's heat for quite a while.
•If you don't want to slice your chillies up, you will need to put a hole or slit in each of your chillies. This will allow the vinegar to get in and complete the pickling process. It also prevents the chillies from floating.
•Make sure you use pickling salt not table salt - they're not the same thing! If you can't find it, you're not looking hard enough - even many supermarkets carry it. Cooking shops, spice shops, continental stores, online ....
•If you are pickling for presentation purposes, use white vinegar as it does not affect the colour excessively. If you are pickling for yourself, i.e. maximum flavour, and not worried about colour, use cider or malt vinegar as they have a better flavour.
•Don't use caps/lids that will result in metal being exposed to the vinegar. The two will react and can cause toxins to be produced - it will also taste like crap.
•Air is a major spoiler of food. When pouring in the brine, leave little or no roomat the top of the jar. Caps should fit well to prevent air entering the jar.
•Once you've poured the pickling brine over the chillies, little bubbles that get stuck can usually be removed by tapping the side of the jar with the back edge of a knife.
•If the bubbles will not move, you can stick a knife blade into the mixture between the fruit and the glass to get rid of them. Put some effort into this as those bubbles contain bacteria that could spoil the batch.
A Few Recipes To Get You Started
Don't limit yourself to these two - use your imagination. Try adding other spices to the brine, layer the chillies by colour, put some vegetables in as well,
Basic Pickled Chillies
This recipe is for approximately 900g of chillies.
I soak the chillies overnight in the brine first as it keeps the chillies crisper when pickled.
Brine
•3 cups water
•1 cup pickling salt
Combine the salt and water. You don't want holes/slits in your chillies yet.
Cover the chillies with the brine in a bowl and put a plate or something similar over them to keep the chillies submerged. Soak the overnight then drain, rinse well, and dry.
Pickling Solution
•3 cups white vinegar
•3 cups water
•3 teaspns pickling salt
Poke two or three small holes in top of each chilli and pack them tightly in sterilized jars leaving 1cm (½ inch) at the top of the jar.
In a saucepan, combine the water, vinegar, and salt. Bring the solution to a boil and then pour over the chillies, leaving no space at the top. Remove trapped air bubbles.
Store for 4 to 6 weeks in a cool, dark place before serving.
Pickled Vege Garden
In this one I leave the amounts and particular ingredients up to you.
•Chillies, try and get some different colours in here
•Cauliflower and or broccoli, in florets
•Zucchini, unpeeled, thinly sliced
•Carrots, cut into rounds or use baby carrots
•Small, pickling onions, peeled and left whole
•Garlic cloves, whole
•Celery, cut into 3cm lengths
•1 part water
•1 part vinegar
•2 teasp pickling salt per litre of liquid
Arrange your choice of vegetables and chillies in sterilized jars.
Boil the water, vinegar and salt to a boil for about a minute. Pour over the vegetables, leaving no room at the top, and cover. Allow the mixture to pickle for at least 3 weeks in a cool, dark place before serving.
Chili Pickles- Quick and Easy
Essentially non-oil base, almost no cooking is required. Can be taken as complimentary to a dish, e.g. chili pickle to noodles, ginger pickle to sushi.
Can also be taken as an entree e.g. papaya pickle, ginger pickle, and most Chinese pickles.
The vinegar pickle base:
1 cup cider vinegar or Chinese rice vinegar
4 tbsp sugar (variable) 1/2 tsp. salt 1 tbsp lemon juice.
Warm the vinegar base, stir till sugar and salt dissolves. Add anything to be pickled.10 green chilies, 8 cm long, washed and dried thoroughly, diced circular.The most important procedure is the drying process. If not dried properly, the pickle will go bad very soon. Wash the stuff to be pickled, in this case, chilies, thoroughly. Pat dry or air dry thoroughly. This ensures that the pickle have a long shelf-live. Further refrigeration prolong it too.
Chili pickle
Add chili to the pickle base and mix well.
Let cool. Refrigerate for the pickle to remain crunchy even after 6 weeks. Pickled chili tastes less fiery due to the sweetening
effect of the sugar.
Besides chili, you can use the same vinegar pickle base to pickle onions, cucumber, zucchini, garlic, ginger, mango, cabbage, beet roots, carrot, etc.
Easy Chinese Pickled Chilli
The fish sauce obviously adds a different dimension to this however, the flavour is different from western pickles because of the rice vinegar which is less acidic and of milder flavour.
•1 kg (2.2 lb) sliced chillies
•1 cup rice wine vinegar
•3/4 cup white sugar
•6 teaspoons fish sauce
Place the vinegar and sugar in a saucepan, and stir over low heat, without boiling, until sugar is dissolved.
Then simmer, uncovered and without stirring, for about 5 minutes, or until mixture is slightly reduced. Remove from the heat, stir in fish sauce and then add the chillies. Store in a sealed jar in the fridge - it's ready to start eating after about 1 week and will keep for months.
CREDIT : http://www.chillies-down-under.com/pickling-chillies.html
Subscribe to:
Posts (Atom)